Showing posts with label Buttercream. Show all posts

Tuesday, February 8, 2011

Laces OUT!

In honor of the Super Bowl I whipped up some goodies.  Nothing too fancy but I had an idea to make these little guys and look how cute they turned out!  I made chocolate fudge cupcakes and snickerdoodle cupcakes.


I used the "grass tip" with green buttercream for the grass, mini pretzels for the field goal posts, and Milk Duds for the footballs (painted the laces with white gel icing). I made little toppers with the Green Bay and Steelers logos.


I had the itch to make a cake too so I made a 3 layered cinnamon buttercream cake.  I dusted the top with cinnamon sugar and made the football out of gum paste.  Not sure why I used yellow icing, it was the first color I grabbed.


Congrats to the Green Bay Packers! (glad football is over, I'm not a fan lol) 

Friday, February 4, 2011

Makin' Whoopie

The other night I wanted to make something quick and different.  For Christmas I was given some yummy baking goods and I wanted to put some to use.  One of the fab gifts I received was a kit that included a Whoopie Pie kit!  Now, I've never made Whoopie Pie so I was looking forward to this new adventure (oh that and sweet tooF kept dropping hints about me makin' them).

I threw the damn box away so I don't remember the brand of the kit (and yes it was a kit. Sometimes I take the quick and dirty route, a box kit "GASP" I know).

Needless to say they came out yummy!

I used a regular baking sheet to get them started:

bake for approx 7 minutes and done!

while cooling, I whipped up the filling which is a typical buttercream frosting
and all done!!

The ingredients were easy, just add water, oil, butter, and eggs to the batter mix.  Then milk and powdered sugar to the frosting mix.

If you're ever in the mood to make whoopie, and who isn't right?!, these puppies took a total of 15-20 minutes to make! Easy peasy. Oh and apparently sweet tooF liked them as he ate THREE in a row.  I promise you folks, he does not weight 300lbs.

Sunday, December 12, 2010

Cookie Monster Attacks!

Oh my, where has the time gone!! It's almost the end of the year. So much food, so many treats (and my ass keeps getting bigger I'm sure) ah yes 'tis the season to PIG OUT.

AnyHOO, I recently made a couple of cakes for my friend's little boy's 2nd birthday.  Her bday party theme was Cookie Monster!  I was so excited to make these cakes. I had tons of ideas but wanted to make something really cute (and yummy of course).  I was only going to make the little birthday boy a cake but then figured I'd make something for the adults (the kids were getting cupcakes).

After lots of brainstorming, I found a 3D Cookie Monster that was adorable! But then thought, crap, can I make that? It looks really hard.  Well, I went for it, and let me say I was SO pleased with my little guy.

This first cake is a 2 tiered cake covered in fondant.  Top portion was chocolate and bottom was carrot (it was super moist!)  All the cutouts are fondant and Cookie Monster's eyes are marshmallows.  This was a HEAVY cake.


Now comes my little guy, Cookie Monster! First let me tell you that this puppy took FOREVER to pipe ( I had to take several breaks as my hand cramped up). I used the "grass" tip and colored the buttercream Wilton's Royal Blue.  It took a TON of icing color, but soon I realized this stuff darkens over time (I made him the night before the party) so the next day his "fur" color was PERFECT!  His eyes are fondant (held by toothpicks) and his mouth was colored in with black icing.  He's made out of chocolate pound cake (you need to use a dense cake when making 3D cakes).  I used Wilton's Cuddly Bear pan to shape the body. I then cut off the ears and shaped the mouth.  I also added more cake for the arms/hands to make them stand out more.  I stuck and cookie in his hand and VOILA!  Here's my monster:


I'm so happy with how my 3D Cookie Monster came out. Best part, they were both yummy cakes and I received a lot of compliments on them.

Here's a shot of the birthday table with all the goodies!!


Sunday, November 21, 2010

Big Cupcake Alert!

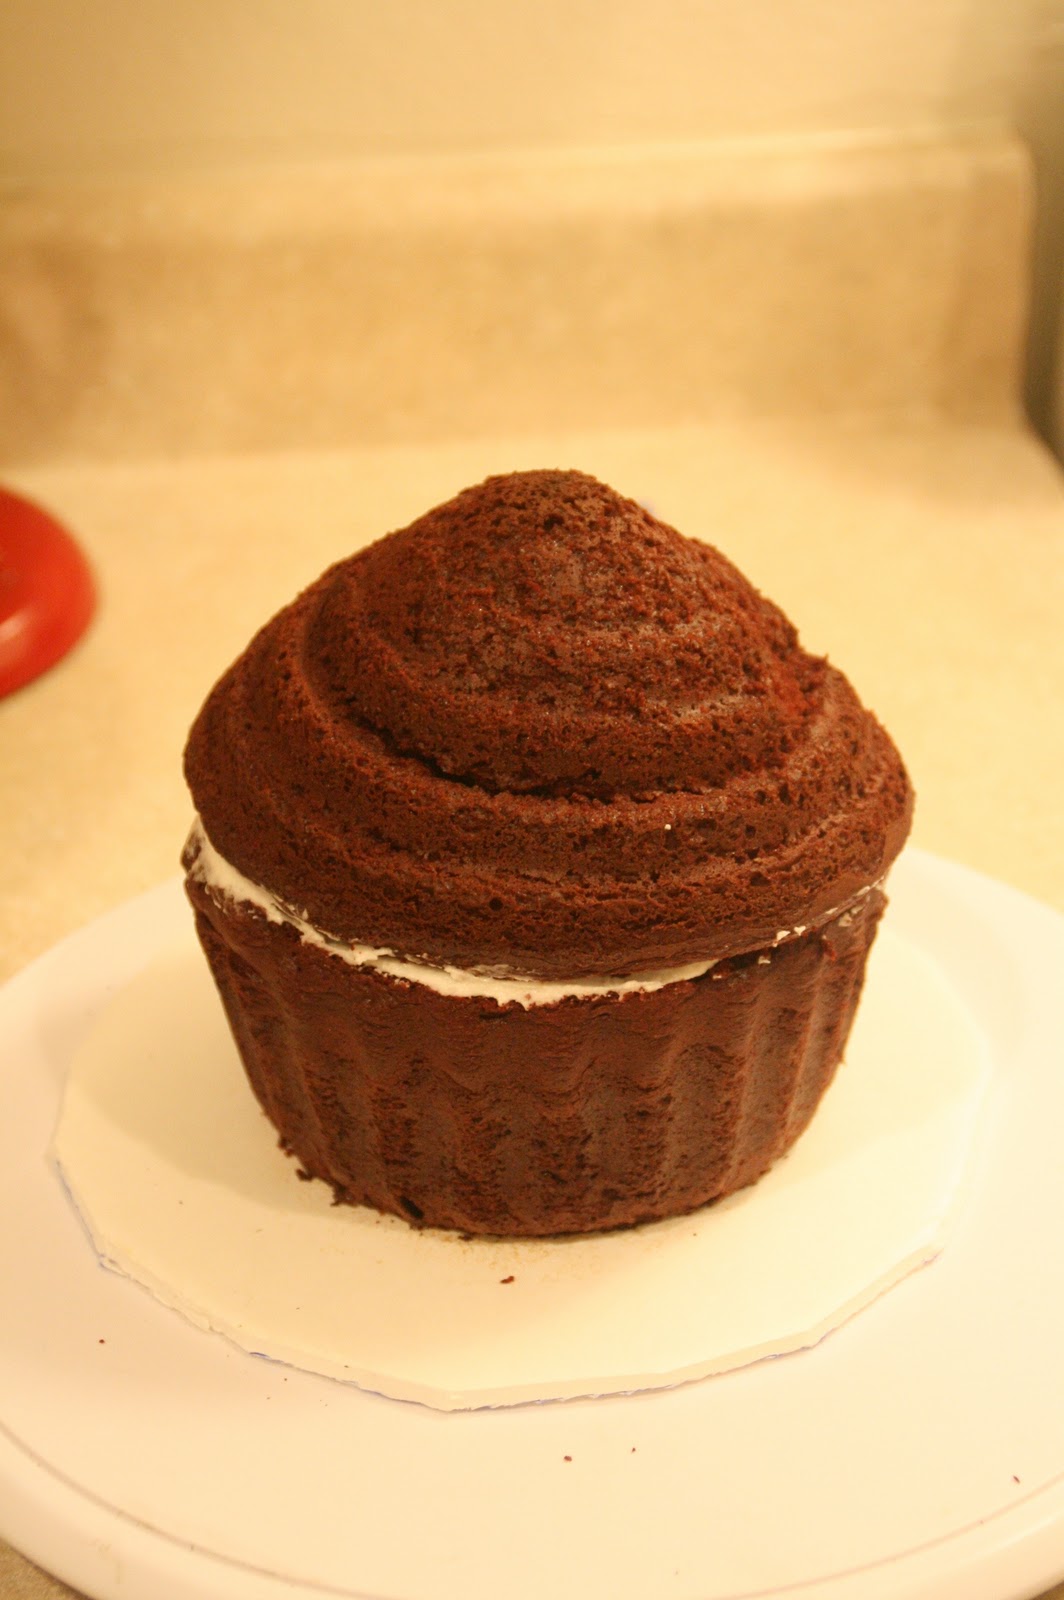
This was my first attempt at a giant cupcake and had no idea how it would turn out.  Needless to say I'm not over the moon with how it turned out but as with everything I'm sure with some practice they'll turn out better.  

First I must say the directions said to make 2 batches of cake mix...WRONG. I made two and had enough for 24 cupcakes with the leftover batter, so uhm no, 2 batches was way too much.  Then it said to bake for about 35-45 mins. Try again, it took 65. yeah 65. 

Anyway, I decided on red velvet since I know that's one of my friend's favs (it was for her birthday). 

Here's they are, all filled and ready to go! 


All done! My kitchen smelled wonnnnnnnderful


While the cupcakes cooled, I whipped up a batch of buttercream.


All cooled, I  had to level out each piece so they would fit nicely on top of each other then added a layer of  buttercream on the bottom piece


Placed the top on and ready to frost!


 All done!!  I used large "sprinkles" and edible pearls.


Ok so here's the scoop.  It wasn't that easy.  First of all, I let it cool almost an hour before removing it from the mold and guess what happened? The top part broke.  Good thing it was going to be covered by icing so you couldn't tell.  Next, I wanted to use the Wilton tip #22 and make little stars but I knew the buttercream wouldn't be firm enough so then my next idea was use the same tip but just make a huge swirl all the way around....nope, I started to and then it began to droop.  Damn.  I had no choice but to smooth it out with an angled spatula.  So all in all, it turned out "ok" but I'd love to try it again for a better result.   It's so big!

Monday, November 8, 2010

Cupcake Camp Inland Empire!

This weekend was the big cupcake event Cupcake Camp IE held at the GORGEOUS Mission Inn Hotel and it was a great success! Bakers from all around brought their delicious treats for a great cause, the Susan G. Komen Breast Cancer Foundation.  Each baker had their own cupcake "booth" and patrons paid a donation of $10 which included 4 cupcakes of their choice.  Let me first start off by saying I couldn't have done this without the help of my awesome sister!!! She was a great assistant (and may I add a great baker too!)
The minimum for "amateur" bakers was 60 cupcakes (professional bakers had to provide at least 300 yikes!). Initially I thought that would be way too many for me to make, but I started baking on Tuesday and by Friday I have over 80 cupcakes! The flavors I went with were:

Red Velvet w/Cream Cheese
Snickerdoodle w/Cinnamon Buttercream
Cookies n' Cream w/ Cream Cheese topped with a mini Oreo cookie!

The morning of the event was a bit hectic in the Sweet B household. I left the frosting for the very last minute (working with cream cheese I've learned it's VERY temperamental and could melt at any time and just look like a big white blob).  Ok, so cupcakes were frosted and ready to go. As we arrived, people everywhere with boxes of yummy treats! As we unloaded I realized some of my red velvets had tipped over and frosting was ruined :(  I lost a good 10-12 cuppies. DAMN! ( I used two different red velvet recipes and of course the ones that came out better were the ones that were ruined effffffff) So set up was fun, there was pink everywhere!! It was so cute! Some people had awesome stands, colorful, creative, it was great.  This being my first "real" event I had no idea what to expect (but I picked up some awesome tips for next time that's for sure).

Doors opened and in came the herd of people. It was PACKED! The most popular flavor was Cookies n' Cream, they went like hotcakes! In fact I ran out of those.  Then the red velvet (that seemed to be a pretty popular flavor with all the bakers) those were gone too.

It was a great event, I LOVED being a part of it and am so glad I participated.  During the event I was asked several times for my business card and was also asked if I wanted to participate in other events! (woohoo!!)

AnyHOO,  here the pics from the event. Enjoy!!! ( I know I did!!)

My table sign 

My red velvets and topper

My Snickerdoodle

My Cookies n' Cream and toppers


My Cupcake Tree with all of my goodies! 

My Table

Here are some pics of the other booths:


Sunday, October 31, 2010

Happy Halloween!! BOO!!

HALLOWEEN is here!!  I was so excited to bake goodies for this ghoulish (heehee) occasion.

Since cupcakes are always a hit, I decided to make Wicked Witch Cupcakes and Evil Spider Cupcakes. Chocolate Devil's food and Buttercream frosting.  
First off let me tell you, they were SO much fun to make. All items used were 100% edible and yummy yummy yummy!

Ok so here's a shot of all the ingredients used:
Black Licorice, Candy Corn, Black Sugar Sprinkles, mini M&Ms, Marshmallows, Sugar Cones, Lollipop Sticks, Edible Food Marker, and of course Cute Baking cups!

I picked these up, they are Wilton Halloween cups:


Edible food marker on a marshmallow:


 Little Jack Skeleton faces :)


Cutting the licorice to use for the spider legs and witch's hair:


All baked and ready to decorate!:


After frosting, roll the cupcakes in black sugar sprinkles


Used red mini m&ms for the eyes and voila!! Aren't they the cutest!! I mean, scary, boo! 


Here are all the goodies! 


Witch cupcakes are awesome. Sugar cone hats, M&M eyes, licorice hair/eyebrows, candy corn nose


Candy Corn toppings:


I'm pretty happy with all the goodies and they were deeeee-lish!  They went like hot cakes!
Now on to the next holiday, Thanksgiving ha!